79 Engineering blogs to level up your system design skills
- Netflix TechBlog
- Uber Blog
- The Cloudflare Blog
- Engineering at Meta
- LinkedIn Engineering
- AWS Architecture Blog
- Stripe Blog: Engineering
- Discord Blog: Engineering & Developers
- Slack Engineering
The complete list
Here is a list of engineering blogs from well-known large companies and startups.
- Asana Engineering Blog
- Atlassian Developer
- Auth0 Blog
- AWS News Blog
- Booking.com Tech Blog
- Canva Engineering Blog
- Cloudera Blog
- Cockroach Labs Blog
- Coinbase Blog
- Confluent Blog
- Credit Karma Engineering
- Databricks Blog
- Docker Blog
- DoorDash Engineering
- Dropbox Tech Blog
- Ebay Inc. Tech Blog
- Elastic Blog
- Eventbrite Engineering
- Expedia Group Tech Blog
- GitHub Engineering
- Grab Tech
- Grafana Labs Blog
- Groupon Product and Engineering
- Gusto Engineering
- Heroku Blog
- HubSpot Product Team & Engineering
- Indeed Engineering
- Building at Instacart
- Instagram Engineering
- Intel Technical Library
- Jane Street Tech Blog
- Khan Academy Engineering
- LINE Engineering
- Lyft Engineering
- Mixpanel Engineering
- Nextdoor Engineering
- Nvidia Blog
- Okta Developer
- The Paypal Technology Blog
- Pinterest Engineering
- Postman Blog
- PubNub Blog
- Engineering at Quora
- Rapid Blog
- RedditEng
- Red Hat Developer Blog
- Riot Games Technology
- Snap Engineering
- Shopify Engineering
- Square Corner Blog
- Squarespace Engineering
- Stack Overflow Engineering
- Stitch Fix Technology
- SurveyMonkey Engineering
- ThoughtWorks Insights
- Thumbtack Engineering
- Timescale Blog
- Tinder Tech Blog
- Toptal Blog
- Twilio Blog
- Twitter Engineering
- Twitch Blog
- Wayfair Tech Blog
- Yelp Engineering Blog
- The Zapier Engineering Blog
- Zendesk Engineering
- Zillow Tech Hub
- Zomato BlogZoom Developer Blog
- Zoom Developer Blog
- Zynga Engineering Blog
Source: From Byebytego newsletter
Ansible Dynamic Inventory plugin for vmware
The best way to interact with your hosts is to use the VMware dynamic inventory plugin, which dynamically queries VMware APIs and tells Ansible what nodes can be managed.
Requirements
To use the VMware dynamic inventory plugins, you must install pyVmomi on your control node (the host running Ansible).
To include tag-related information for the virtual machines in your dynamic inventory, you also need the vSphere Automation SDK, which supports REST API features like tagging and content libraries, on your control node. You can install the vSphere Automation SDK following these instructions.$ pip install pyvmomi
To use this VMware dynamic inventory plugin, you need to enable it first by specifying the following in the ansible.cfg file:
[inventory]
enable_plugins = vmware_vm_inventory
Then, create a file that ends in .vmware.yml or .vmware.yaml in your working directory.
The vmware_vm_inventory script takes in the same authentication information as any VMware module.
Here’s an example of a valid inventory file:
plugin: vmware_vm_inventory
strict: False hostname: 10.65.223.31
username: administrator@vsphere.local
password: Esxi@123$%
validate_certs: False
with_tags: True
Executing ansible-inventory --list -i <filename>.vmware.yml will create a list of VMware instances that are ready to be configured using Ansible.
Using vaulted configuration files
Since the inventory configuration file contains vCenter password in plain text, a security risk, you may want to encrypt your entire inventory configuration file.
You can encrypt a valid inventory configuration file as follows:$ ansible-vault encrypt <filename>.vmware.yml New Vault password: Confirm New Vault password: Encryption successful
And you can use this vaulted inventory configuration file using:$ ansible-inventory -i filename.vmware.yml –list –vault-password-file=/path/to/vault_password_file
My sample dynamic_inventory.vmware.yml
—
plugin: vmware_vm_inventory
strict: False
hostname: vcenter_hostname
username: vcenter_username
password: vcenter_password
validate_certs: False
#This will make sure vm’s filter based on tags
with_tags: True
#This option will help to use for dynamic fetch and no cache on disk
cache: no
# Create/filter groups basedo on tags, ex: below one fetch all the linux machines along with tag and we can use -l option to limit the execution
properties:
– ‘config.name’
– ‘guest.ipAddress’
– ‘guest.guestFamily’
– ‘summary.runtime.powerState’
keyed_groups:
– key: tag_category.Tier
prefix: “vmware_tag_category_”
separator: “”
with_nested_properties: True
filters:
– summary.runtime.powerState == “poweredOn”
– guest.guestFamily == “windowsGuest”
– guest.guestFamily == “linuxGuest”
hostnames:
– ‘config.name’
sample.yml:
—
– name: Sample Dynamic Inventory Check
hosts: all
gather_facts: False
vars:
ansible_ssh_extra_args: ‘-o StrictHostKeyChecking=no’
tasks:
– name: List Home dir
command: ls /home
register: output
– debug:
msg: Listing the home directory {{ output.stdout_lines }}
How to run and test the inventory:
ansible-inventory -i dynamic_inventory.vmware.yml –grapth (use list also –list)
ansible-playbook -i dynamic_inventory.vmware.yml -l <Prod> sample.yaml
Ref/: https://runebook.dev/en/docs/ansible/collections/community/vmware/vmware_vm_inventory_inventory
MS-Teams integrate with Jenkins Build notifications
Integrate Jenkins with Github using SSH key(Linux)
- Create a ssh key using ssh-keygen comamnd from your jenkins/build server
- During this process you will be generated two files under /.ssh, Private key id_rsa, Public Key id_rsa.pub
- Copy the public key id_rsa.pub content(ex: ssh-rsa AAAABcfffrtyuuuu ) into your github repo (https://github.com/settings/keys)
- After that create a new credentials(Manage Jenkins–>Credentials ) named, SSH Username with private key

5. Finally create a jenkins and add git repo and test, you might successfully clone the repository using ssh key.
Nexus is not coming up || Incompatible sonatype-work database model detected
Problem Statement: Nexus server launch failed with IllegalStateException and immediate shutdown.
Error:
2020-12-01 16:50:31,032+0000 ERROR [FelixStartLevel] *SYSTEM org.sonatype.nexus.upgrade.internal.orient.UpgradeServiceImpl – The database model for component is 1.15, but the latest supported by this version of nexus is 1.14
2020-12-01 16:50:31,034+0000 ERROR [FelixStartLevel] *SYSTEM org.sonatype.nexus.upgrade.internal.orient.UpgradeServiceImpl – The database model for p2 is 1.2, but the latest supported by this version of nexus is 1.1
2020-12-01 16:50:31,041+0000 ERROR [FelixStartLevel] *SYSTEM org.sonatype.nexus.upgrade.internal.orient.UpgradeServiceImpl – Failed transition: NEW -> STARTED
java.lang.IllegalStateException: Incompatible sonatype-work database model detected. Will result in failure to launch. Shutting down.
at org.sonatype.nexus.upgrade.internal.orient.UpgradeServiceImpl.validate(UpgradeServiceImpl.java:156)
at org.sonatype.nexus.upgrade.internal.orient.UpgradeServiceImpl.doStart(UpgradeServiceImpl.java:76)
Resolution: In logs we find some database model version is not supporting with the nexus server
Follow below steps to resolve above issues!!!
Step1: Shutdown Nexus
Step2: Run: java -jar $INSTALL_DIR/lib/support/nexus-orient-console.jar
Note: $INSTALL_DIR is your nexus installation path (ex: /opt/nexus)
At the orientdb prompt run the following:
Step3: connect plocal:data/db/config admin admin
Step4: select from upgrade_model_versions (this will display existing versions of db model)
Step5: update upgrade_model_versions set component=’1.6′ ( You can degrade/upgrade as per error)
Step6: Restart the nexus server to reflect the changes
Ref: https://issues.sonatype.org/browse/NEXUS-13098
Thanks,
ANR
How to retrieve passwords in mRemoteNG application
What is mRemote?
mRemote is application which can help to connect remotely RDP,SSH,VNC & more and it’s allow to provide ip,uname,pwd, protocol to connect remote host frequently
How to install & use mRemoteNG?
https://www.howtogeek.com/171472/how-to-use-mremoteng-to-manage-all-your-remote-connections/
Follow the method to retrieve pwd in case if we forgot it:
Step1: Create a new external tool by selecting ‘Tools’ -> ‘External Tools’, Right click and select ‘New External Tool’
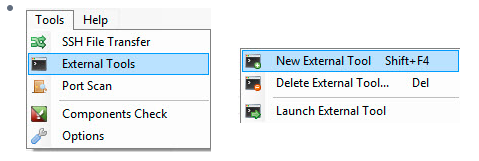
Step2: Select New tab and fill with below details

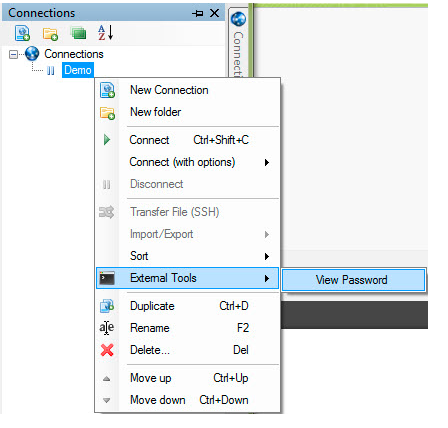
Step3: Test the password by right clicking on you connection -> ‘External Tools’ -> ‘View Password’, the password details will open on cmd prompt screen.
Travel_Diaries


Emails are not triggering in jenkins
Problem Statement: Emails are not triggering as part of CI/CD builds(Jenkins)
Errors: Below error from job console logs
Connection error sending email, retrying once more in 10 seconds……
Solution: Need to configure SMTP server under manage jenkins section
Configure SMTP server under “Manage Jenkins” -> “Configure System” -> “Extended E-mail Notification”
&&
configure SMTP server. For example under “Manage Jenkins” -> “Configure System” -> “E-mail Notification”.
Note: Make sure SMTP server is configured at server level as well
Thanks,
ANR
Nexus Upload issue||A database corrupted
Problem Statement:
When we are trying to upload artifacts to nexus, getting 500 internal server error.
Nexus version: 3.25.1-04
What we found from logs:
2020-10-19 12:50:49,745+0000 ERROR [qtp624704453-43] admin com.orientechnologies.orient.core.storage.impl.local.paginated.OLocalPaginatedStorage – Exception 6D4E0681 in storage plocal:/nexus-data/db/component: 2.2.36 (build d3beb772c02098ceaea89779a7afd4b7305d3788, branch 2.2.x)
java.lang.NullPointerException: null
at com.orientechnologies.orient.core.db.record.ridbag.sbtree.OIndexRIDContainerSBTree.(OIndexRIDContainerSBTree.java:88)
What is solution applied:
With the above error, there was some internal database got corrupted
Steps to repair the corrupted DB:
1.Shut down Nexus service
2.Make a backup of /nexus-data/db
3.Run: java -jar $INSTALL_DIR/lib/support/nexus-orient-console.jar
At the orientdb prompt run the following:
connect plocal:/nexus-data/db/component/ admin admin
repair database --fix-links
rebuild index *
disconnect
exit

4.Then restart Nexus and validate the upload files.
Ref: https://issues.sonatype.org/browse/NEXUS-18036
Curl command to upload nexus maven artifacts :
curl-u admin:admin --upload -file sj.zip <nexus_url>/repository/sj/test/sj/1.0/sj.zip
Thanks,
ANR
Docker Container || httpd (pid 2369) already running
Hi All,
We have implemented docker backup mechanism for the Apache, when we start docker container won’t start because an existing pid file.
After googling we came to know the cause of the error.
The issue might be caused by committing a container with a running web server into a new image, and then trying to run the new image
By considering above information, we have follow below steps to mitigate the problem!
- Restore apache container with the backup image by using docker load <image_name>
- Login into apache container and search for file name “httpd.pid”
Command: find / -name “httpd.pid”
ex: [root@123abc/]# find / -name “httpd.pid”
/run/httpd/httpd.pid
- Remove the file rm -rf /run/httpd/httpd.pid
- After removed, start the Apache service
ref: https://stackoverflow.com/questions/28654076/docker-container-wont-start-because-an-existing-pid-file
Approach 2:
The same can be done with other steps, even without login to container
Step1: docker container inspect <container id>
Step2: Search from host machine with the httpd.pid file based on the upper-level directory of the directory pointed to by the value of WorkDir (that is, the end does not contain work) .
[root@centos7 ~]# docker inspect <Apache container name> |grep -i UpperDir
“UpperDir”: “/opt/overlay2/a8e9154deea93e539ca4f2528355526f0085e46c630ca72d45b412345667/diff”,
Stpe3: [root@centos7 ~]# find /opt/overlay2/a8e9154deea93e539ca4f2528355526f0085e46c630ca72d45b412345667/diff -name httpd.pid
/opt/overlay2/a8e9154deea93e539ca4f2528355526f0085e46c630ca72d45b412345667/diff/run/httpd/httpd.pid
Step4: Delete the pid file by issuing command rm -rf
/opt/overlay2/a8e9154deea93e539ca4f2528355526f0085e46c630ca72d45b412345667/diff/run/httpd/httpd.pid
Step5: Once deleted, login to apache container and check if any syntax errors httpd -t, if syntax OK then start the apache process
Ref: https://zhuanlan.zhihu.com/p/161919713
Thanks,
ANR
